Altering Silhouette: The Petticoat
- Nicole Gemma C

- Apr 20, 2019
- 2 min read
Updated: May 19, 2019
How I created a stunning A-line, hourglass silhouette using a layered underskirt.

I don't know about you, but I've always loved the classic hourglass silhouette. The accentuation of curves, of femininity. I just find it so inexplicably beautiful. Of course, this silhouette is known to have been prevalent throughout the 1950s - just look at this stunning picture of Sophia Loren in her "Little Black Dress" by Christian Dior.

It would seem like common sense, but it didn't occur to me that an effective way to create this stunning shape would be through the use of a puffy undergarment! Thanks to my teacher's suggestion, my petticoat was soon underway.


First, I created lines, about 20cm apart from each other onto my paper pattern, indicating where each tier of tulle would be placed. I marked lines for 3 tiers. In order to figure out how much tulle would be needed and what length would be needed for each doubled layer, I measured the circumference at each layer-line, and proceeded to cut through my 12 metres of tulle, ready for gathering and sewing onto my base underskirt.


Next, I sewed some sturdy Trilene fishing wire onto my doubled tulle, 2cm from the edge with a zig-zag machine, being sure to catch the wire in the middle of the stitches. Using fishing wire is a neat little trick for gathering the tulle with ease. All you have to do is slide the tulle along the wire, to your desired amount of gather. This was recommended to me by my teacher, very clever! This was then stabilised by using a flat-bed machine to sew a ribbon over the top of the stitching and wire. Last but not least, the completed tier of tulle was sewn to the marked line on the base skirt.
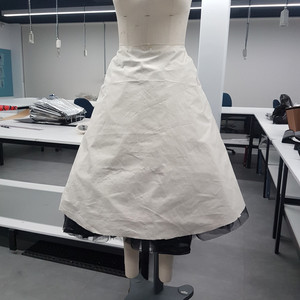
In the end, it turned out I needed a fourth tier underneath the waistband to create a more full A-line structure. This also further emphasised the hourglass silhouette I was desiring.

It turned out stunning, and I was so stunned that I sewed it all myself. Yes, there were machine troubles (technology and myself sometimes have disagreements), and other obstacles along the way (such as realising the need for a fourth tier of tulle) - but these were resolved and I felt proud of myself for achieving this beautiful result. The overskirt fits just beautifully on top! My next mission is to decide whether I want to show some of this glorious petticoat below the hem of my completed skirt, or whether to cover it and utilise it only practically. Have your own opinion on the matter, or some more petticoat-making tips? Feel free to share your thoughts with me in the comments or at nicole@nicolecandeloro.com!


Comments